Sunday, November 16, 2008

Oatmeal Raisin Cookies with Walnuts

Before the new Barefoot Contessa cookbook, "Back to Basics", had made it to my local Costco, I received news that it had touched down at the Costco in Richmond, BC. Emails and messages from various friends around the country started coming in. "Have you seen it yet?" and "Just wondering if you knew..."

My librarian called to say that I had the new book waiting for me to pick up, and my friend, Brenda, sent me the link to a great price at Amazon. I have indeed bought the book (at Costco) and I have gone over it several times already. Thank you to all of my friends who brought the new cookbook to my attention!

One recipe that caught my eye were the "Raisin Pecan Oatmeal Cookies". Ina mentions that she was looking for years to find the perfect oatmeal cookie, and finally here it is. This interested me greatly because the oatmeal raisin cookie category at the Harrow Fair is quite tough. Could the Barefoot Contessa's cookies be that good that they might be a contender at the fair? I won't have the answer to that question for several months, but last night I whipped up a batch to satisfy my curiosity - and my sweet tooth.

My friend Donna was over for dinner and after enjoying a bowl of guacamole (Oct. '08), chicken stew with biscuits (Feb. '08), and a zippy salad of arugula with a lemony vinaigrette, we had the oatmeal cookies and a cuppa tea. Donna said that she normally doesn't like raisins in cookies but for some reason, she really liked these. They were a little crispy on the outside, chewy on the inside, nice flavour (due to the cinnamon), great texture because of the raisins and the walnuts, and an all-round good cookie.

You might be wondering why the oatmeal raisin category is so tough. At the fair, the judges are looking for the standards. They want the best of the best, with no variations or frills. Dried cranberries or currants would be disqualified. If the cookies included walnuts or pecans, I'm sure they would be overlooked as well. If the cookies are slightly dark on the bottom or any other visual flaw, you are made aware of your cookie's short comings by a notation from the judges. So you see, a recipe like oatmeal raisin cookies, with it's countless variations, can be a tricky category to enter. With that said, the Barefoot Contessa rarely disappoints me, and I think these cookies could do really well next year. Try them for yourself and let me know what you think.

Raisin Walnut Oatmeal Cookies

1 1/2 c. walnuts
1/2 lb. unsalted butter, at room temperature
1 c. dark brown sugar, lightly packed
1 c. granulated sugar
2 eggs, at room temperature
2 t. pure vanilla extract
1 1/2 c. all purpose flour
1 t. baking powder
1 t. ground cinnamon
1 t. kosher salt
3 c. old-fashioned oatmeal
1 1/2 c. raisins

1. Preheat oven to 350 degrees. Place the walnuts on a sheet pan and bake for 5 minutes. Set aside to cool and then chop coarsely.
2. In the bowl of an electric mixer fitted with the paddle attachment, beat the butter and the sugars together until light and fluffy. With the mixer on low, add the eggs, one at a time, and the vanilla.
3. Sift the flour, baking powder, cinnamon, and salt together into a small bowl. With the mixer on low, slowly add the dry ingredients to the butter mixture. Add the oats, raisins, and walnuts and mix until just combined.
4. Using a small ice-cream scoop or a tablespoon, drop 2-inch mounds of dough onto sheet pans lined with parchment paper. Flatten slightly with your hand. Bake for 12 to 15 minutes, until lightly browned. Transfer the cookies to a baking rack and cool completely.

Thursday, November 6, 2008

Persimmon Pudding


Around this time of year, persimmons start to show up in grocery stores. Persimmons can be a bit puzzling if you have never tried them. If you eat them while they are still firm, you will be unpleasantly surprised to have a weird, fuzzy feel in your mouth. Persimmons must be ripe, to the point of mushy, before they are ready to be eaten. There are different varieties of persimmons, the two most popular available here are shown above. The squat, smaller ones are known as "fuyu" and the larger, heart-shaped persimmons are known as "hachiya".

I first started eating persimmons when I worked at Meinhardt Fine Foods in Vancouver. The produce manager gave me some insights into the persimmon. If you don't know what you should be looking for in a persimmon, you might pass over the soft, mushy ones. During persimmon season, I would head into the produce department after work and offer to buy the really soft ones. He was usually glad to get rid of the ones that were really soft and always gave me a deal. I would take the persimmons home, peel them, and eat them right away.

Eventually, I started looking for recipes that featured persimmons. They are perfect for baked desserts. This recipe reminds me of a Christmas pudding. Leave the raisins and/or nuts out of the batter, if you like. I served the pudding with vanilla ice cream, but I know it would be delicious with a creme anglaise (custard sauce). Even whip up a quick Bird's custard sauce (the powder that comes in a can with a bird on it). Jamie Oliver claims that Bird's custard sauce is his only vice, so it can't be all that bad!

Persimmon Pudding

2 c. flour
1 t. baking powder
1 t. baking soda
1/2 t. kosher salt
1 1/2 t. ground cinnamon
1 t. ground ginger
3 eggs
1 1/2 c. firmly packed brown sugar
1/2 c. unsalted butter, melted & cooled
1 T. pure vanilla
2 c. cream
2 c. persimmon puree (from approximately 4 large or 6 small very ripe persimmons)
1 c. raisins
1 c. chopped pecans or walnuts

1. Preheat an oven to 350 degrees. Butter a 9-inch square or round baking dish.
2. In a bowl, combine the flour, baking powder, baking soda, salt, cinnamon, and ginger. Stir to mix thoroughly; set aside.
3. In a bowl of an electric mixer, combine the eggs and sugar. Beat until well blended. Stir in the melted butter and vanilla. Add the dry ingredients and stir until moistened. Slowly stir in the cream and the persimmon puree. Mix in the raisins and the nuts. Pour into the prepared baking dish.
4. Place the baking dish in a larger baking pan. Place the pan in the oven and pour in enough hot water (not boiling) to reach about halfway up the sides of the baking dish. Bake until a wooden skewer inserted into the center comes out almost clean, about 1 1/2 hours. Transfer to a wire rack to cool slightly. Serve warm with custard sauce, caramel sauce, or vanilla ice cream.

Sunday, November 2, 2008

A Japanese Lunch & The 100th Good Egg Blog Entry

It's hard to imagine that there have been one hundred entries on "The Good Egg Blog". I love looking back on past entries and seeing how the blog has changed and (hopefully) improved over the last year and a half. There are always new things to write about and recipes to visit and re-visit. It is my hope that you will continue to use The Good Egg Blog as a you would an old, favourite cookbook. As always, I love hearing from you and getting your suggestions on things you would like to see or ideas about how to make recipes better. I am looking forward to the next one hundred entries! Read on to learn about the sensational lunch that my sister prepared for me today.

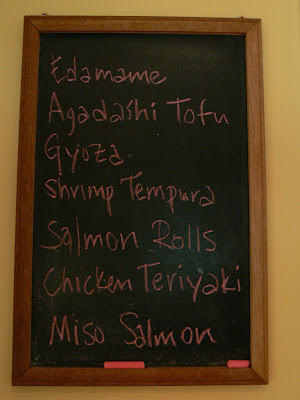
This afternoon, Ellen & I went to Lori's house for a Japanese lunch. The menu was displayed on the chalkboard when we arrived (see above). Lori's inspiration for this special lunch was a book called "Harumi's Japanese Cooking". Apparently, Harumi Kurihara is the "Martha Stewart" of Japan. This is her first book to be published in North America. After just skimming the surface of this cookbook, there are lots of recipes that I would like to try - not too complicated, just delicious.


By the time Ellen & I arrived, Lori was well into the preparations for lunch. She had made dashi stock (a stock made from kombu and dried fish flakes) and had at least three dipping sauces for different dishes. The first thing we tried were the gyoza (Chinese-style dumplings). There is a big difference between fresh, flavourful gyoza, and the gyoza that you will sometimes come across at restaurants (frozen, not hand-made, tough). In the cookbook, she instructs not to seal the dumplings after they are filled. Lori & I questioned this method but she decided to do the first batch without sealing the edges of the dumpling wrappers (see picture above). The method for cooking the dumplings was to fry them in a little oil in a pan till crispy, then add hot water and cover for about 5 minutes to steam. When most of the water is gone from the pan, drizzle a little sesame oil over the gyoza and cook until they are crispy again. They were amazing, but the filling, which was a mixture of shrimp and pork, kept falling out of the dumpling wrappers. We did the next batch with sealed edges and they were excellent.

Most people who enjoy going to Canadian-Japanese restaurants will also know, and probably love, Agadashi Tofu. Lori hung the tofu to drain the water and then cut it into squares. The squares were then rolled in potato starch and deep-fried. Afterward, we decided that they squares should have been cooked a little longer to achieve a crispier skin on the tofu, but let me tell you, this was fantastic. My parents also happened to be at Lori's and even they enjoyed this dish (we weren't sure that they would enjoy the variety of food that was on the menu, but they did very well). The fried tofu was then put in the dashi stock, and garnished with finely shredded daikon radish, fresh ginger, green onions, and fish flakes. Oh my, oh my!


The edemame (soybeans) were just like you would imagine them at a restaurant. Lori steamed a bag of frozen edamame in a bamboo steamer. When they were done, she sprinkled fleur de sel over them. For those of you who haven't had edamame, you pick them up in your fingers, and by squeezing the pod with your teeth, the bean inside will pop out. You also get a touch of salt with each bean, making these a very addictive little appetizer or snack. For the meat, she marinated slices of fresh salmon in miso sauce for about 24 hours. At the same time, the chicken pieces were marinating in a terriyaki sauce. They were both baked in the oven. Harumi calls for marinating the salmon for up to three days.


A big challenge for Lori was getting the tempura to cook perfectly. You need to start with the right ingredients for the batter. The flour (she used Double XX flour which is used for pasta, I think) needs to be refrigerated. Everything needs to be very cold. The flour is then gently mixed with sparkling water, egg, and baking powder. The other key is having your oil at the correct temperature. The oil was not rolling, but it was lively. This is where a candy thermometer comes in handy, but Lori doesn't have one and I forgot to bring mine. She did thinly sliced sweet potato, eggplant, red onions (which I loved!), and prawns. All the tempura was crispy and the dipping sauce was perfect. Wow!

Last, but certainly not least, we had the salmon. Lori had ordered one pound of sushi-grade tuna for our meal. Apparently, we are at the tail-end of tuna season, and the fish shop wasn't able to get her any of the highly anticipated fish. Instead they gave her a free pound of sushi-grade salmon. We were disappointed (not about the free part!), but we really shouldn't have been. The
salmon was divine. Lori cooked up the sticky rice and Jake (remember Jake who stopped taking my calls on canning day?) carved the salmon into long pieces for maki rolls, and appropriate sizes for sushi (fish on little logs of rice) and sashimi (just the raw fish). The texture was amazing. "Sushi-grade" really means something. I don't think I would try making sushi from regular old salmon, especially not the farmed variety.

Our Japanese lunch was unforgettable. The only unfortunate part of this meal was the fact that Lori and Jake were both working on putting the food together while the rest of us were enjoying it. It would be a great meal to do around an island in your kitchen where people could sit, watch, and chat while you are cooking. Thank you Lori & Jake!