Sunday, March 30, 2008

Triple Ginger Scones


Two years ago, I had the idea that I wanted to start baking and selling my own creations at the Newmarket Farmer's Market. Only after diving into the venture did I realize how much time it would actually take to have enough baking done for Saturday mornings, to make a go of it. Ellen was still just a baby at that time, and I figured I would start up again after she was a bit older. So far, I haven't gone back to selling at the market, but never say never!

The Friday night before my first day at the market, I was being driven insane wondering if I had enough cinnamon rolls, granola, cookies, etc. I decided, on a whim, to make two batches of scones. The maple-oatmeal scones and the cheddar-dill scones (find the recipes in July & June 2007 respectively). As fate would have it, they were the most popular items from day one. The second week, I added the triple ginger scones, and I sold out just as quick. In case you're wondering, they were priced at $2 each.

Personally, I love the chewy bits of candied ginger. If you are going out to buy candied ginger, try to find the soft, chewy chunks, which are fresher. If they are harder, little, dice-like pieces, it doesn't matter. Just watch your fingers when you are cutting them up! I buy mine at health food stores or you may find it at someplace like the "Bulk Barn".

As recent as this past Christmas, I had a faithful customer from the market, call and order two dozen scones (12 triple ginger, 12 cheddar-dill). Often she will have people over for dinner and serve a soup course. She loves to serve the scones in her bread basket, and she requests that I don't put sugar on top of the ginger scones, making them suitable for serving with a pumpkin soup, for example. What a great idea!

Triple Ginger Scones

4 c. plus 1 T. all-purpose flour
2 T. baking powder
2 T. sugar
2 t. ground ginger
2 t. kosher salt
3/4 lb. cold, unsalted butter, diced
4 extra-large eggs, beaten lightly (4 x-large eggs equals 1 cup*)
1 c. cold heavy cream
1 T. grated fresh ginger
1 c. candied ginger, roughly chopped
1 egg beaten with 1 T. milk or water, for egg wash
Raw sugar (demerara sugar)

1. Preheat oven to 400 degrees. Combine 4 c. of flour, baking powder, sugar, ground ginger, and salt in the bowl of an electric mixer fitted with a paddle attachment. Add the cold butter and fresh ginger and mix on low speed until the butter in pea-sized pieces.

2 Mix the eggs and heavy cream and quickly add them to the flour and butter mixture. Combine until JUST blended. Toss together the candied ginger and 1 T. of flour and add them to the dough. Mix until they are almost incorporated.

3. Dump the dough onto a lightly-floured surface and knead it together until the little pieces of candied ginger are distributed throughout the dough and most of the flour has been incorporated. Do not over mix! Roll or pat the dough into a 1-inch thick square (about 8 inches square). Cut into 4 4-inch squares and then in half again. Now cut these into triangles, ending up with 16 triangular scones.

4. Brush the tops with egg wash and sprinkle with raw sugar crystals. Bake on a baking sheet lined with parchment paper for 20 minutes, turning the pan around half way through the baking time. The scones should be a light, golden brown.

*Because I use Farmer Jones' eggs, they are never consistent in size. When I am mixing the eggs and cream, I use a 2-cup measuring cup and measure the eggs first. If I have less than 1-cup of eggs, I will add another egg to the mixture, and then pour in the whipping cream, for a total of 2 cups.

*If you have the time, put the unbaked scones in the fridge for an hour or so (up to 24 hours, if you like) and then bake them from cold. The scones will hold their shape better, and cold butter hitting a hot oven produces flakier baked goods.

*When you pull the scones out of the oven, there is usually a lot of melted butter on the pan. Just leave the scones on the pan and they will soak up any of the butter they they have released during baking. I once made a batch of scones and forgot to add the butter. When they came out of the oven, I knew what I had done right away because there was no butter on the pan, even though the scones looked (to my surprise) picture perfect! Incidentally, I took that butterless batch of cheddar-dill scones over to Farmer Jones and he served them to the chickens and Mr. Cogburn.

Sunday, March 23, 2008

From the Mixed-up Files of Moira A. McDonald

While we were visiting my parents over March break, my Dad mentioned that he had found some files of mine in his filing cabinet. He started bringing armfuls of files down the stairs. Apparently, my very organized father hadn't realized that the entire bottom drawer of his filing cabinet was full of my files on food, cooking, travelling, and other interesting information that I had collected during the years that I had lived there, moved out, moved back in, moved out...

From that pile of paper files, I found some of the most interesting things, some of which I would love to share with you.

I found a menu from THE Barefoot Contessa gourmet food shop from sometime in the late '90's. There is a catering menu and a list of their most popular dishes. A quick glance through that list and you know where most of the recipes came from for Ina's first cookbook, the original "Barefoot Contessa Cookbook". There was also this postcard that says ...


Oh, to have been in the Hamptons for one of the first copies of that cookbook. I wonder if they had any idea how huge Ina's cookbooks would become. Just so you know, the Barefoot Contessa food shop is no longer open. Thanks to my cousin Beth for picking those up for me.

In November 1996, I was living and working in Vancouver and I had an opportunity to meet friends of mine in Honolulu, Hawaii. One of the meals that we pre-planned was dinner at one of Hawaii's best restaurants, "Alan Wong's". We sat at the counter for dinner, looking in on the chefs working their magic. As I look at the menu that I kept from that memorable meal, I am in awe of some of the dishes. The first item on the menu is the "Opihi Shooter". Opihi are a Hawaiian seafood delicacy, they look like an oyster, but are very dangerous to harvest. They grow along the shorelines of rocky cliffs, where the pounding surf is a constant threat to people trying to collect them. The harvesters also have to use a very sharp knife because the opihi cling to the rocks as if their life depends on it, which it does. If I were at Alan Wong's today, that would be the first thing I would order, but I don't think we tried it that night.


Because we were sitting at the counter, we were able to chat informally with the chefs as they worked. I told them that I was a cooking in Vancouver and they joked that I should come and cook with them. It was a great evening and Alan Wong signed my menu with the inscription "To Moira, To the next generation of aspiring chefs. Aloha, Alan Wong". I was thrilled. Well, two days later, I was shopping in the middle of the afternoon and who do I run into? Mr. Alan Wong! He was with his wife and kids, and we had a nice chat. You would have thought that I had run into Magnum P.I. himself, I was so excited!

While I was going through all those files, I weeded out lots (at least 2/3rds) of papers that I have no use for keeping anymore. Of the papers I kept, there are lots of old menus, from places I have worked, as well as eaten. There are articles on many different food topics. From heirloom vegetable seeds to candy-making. From Sauternes (a sweet wine from France) to peppercorns grown in India. I was surprised at some of the information in those files, sometimes vaguely remembering cutting them out, and other times trying to recall what would have led me to be interested in such things.

I have kept lots of information about Chateau Drouilles, the place I lived and worked at in France, and in the coming weeks I will be writing more about that experience. I also found some of my own writing and I may share some of that with you as well. Can't guarantee that it won't be bad, but I have never made that guarantee with anything I have written!

Friday, March 7, 2008

Chewy Chocolate Chip Cookies

In 2004, my sister, Lori, was preparing to marry Jake. Anna Olson, the host of the Food Network show "Sugar", and cookbook author was preparing a wedding segment for her show. Lori & Jake both know Anna Olson from when they worked at the Cave Springs Winery restaurant, Inn On The Twenty, and Anna asked Lori if she would like to be a guest on the show.

The invitation included myself and Lori's best friend, Sarita, and it was actually an invitation to come and do a screen test. We must have done something right, because we were asked to come back. The day of the taping, we were all impressed with how Anna makes it look so easy, and it is no where near easy. While the camera was rolling, we mostly had to sit there and pretend to be busy - it was exhausting! We scribbled notes to each other, as though we were writing out shower invitations, trying to make each other laugh. Example: "Nice hairy lip."

Keep your eyes peeled for reruns of that wedding show. It was an hour long extravaganza of cakes, cookies, candies and ideas, perfect for that special day. And just for the record, I really don't think my voice is as deep as it sounds on the show (but I have been assured that it is).

The whole "Sugar" cookbook is very good, and I have given copies of it to a few friends. I wasn't as impressed by her second book, "Another Cup of Sugar", but it could be that I haven't given it a proper chance. The secret to these fantastic cookies is the addition of cornstarch. I love the chewy texture. It reminds me of the old "chewy chips ahoy" cookies, only better. For all I know, chewy chips ahoy cookies are still around. I wouldn't dream of buying them these days, especially when I can have these homemade ones mixed and baked in under a half an hour.

Chewy Chocolate Chip Cookies

3/4 c. unsalted butter, softened
1 c. golden brown sugar, packed
1/4 c. white sugar
1 egg
2 t. vanilla
2 c. all purpose flour
2 t. cornstarch
1 t. baking soda
1/2 t. salt
8 oz. chocolate chips or bittersweet chocolate cut into little chunks

Preheat oven to 350 degrees. Cream together butter and sugars until smooth. Add egg and vanilla and blend in. Stir in flour, cornstarch, baking soda and salt. Stir in chocolate chips. Drop by tablespoons onto a baking sheet lined with parchment paper. Bake for 8 to 10 minutes, until golden brown around the edges. I have found that once the cookies start to smell good, they are very close to being finished. Let cool slightly and enjoy!

*I usually make a double batch of these cookies in my KitchenAid mixer. If possible, I roll any remaining dough into a log and pop it into the fridge or freezer for later use.
*I use an ice cream scoop to portion out the cookie dough. The one I use makes scoops containing 2 tablespoons of dough. For the kids, I cut the scoops in half and form smaller cookies. For adults, I like to keep them a little bigger. When I was baking for the Newmarket Farmer's Market, I used an even bigger scoop and made huge cookies that looked gorgeous in the glass cookie jars. Just remember, the bigger the cookie, the longer the cooking time.

Tuesday, March 4, 2008

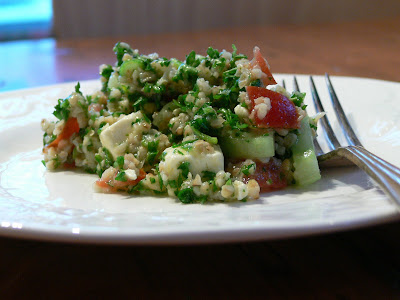
Tabbouleh with Feta


Last week, Oprah had a show on about "Freegans". In a nut-shell, these are people who opt out of consumerism and live on what other people throw in the garbage. They showed people going through grocery store dumpsters, finding food that was perfectly good to eat. Now, I don't want you to think that I am about to start doing this. However, last Thursday, while picking up my milk and groceries at the Clean Food Connection, I found myself looking at things a bit differently.

There were big bags of apples that were set off to the side. They were obviously past their prime but for the first time, I pictured a huge pot of apple sauce. For a much discounted price, I took two bags home and that afternoon, we enjoyed the smell and taste of homemade applesauce (16 cups or so of quartered, peeled, and cored apples, 3/4 c. brown sugar, 1 T. cinnamon, simmered on the stove until they were mushy, then mashed a bit more with a potato masher). After cutting out all the bruises and any rotten parts, there were still tons of apples for the sauce and we all loved it.

Then, I saw two containers of organic feta cheese in a brine. They were a few days past their sell-by date, and marked down half price. Both containers were fine and I used one for the tabbouleh salad and the other one in the spinach pie wrapped in phyllo, from the Barefoot Contessa's first cookbook. All in all, I probably saved at least $15 and saved some food that was perfectly fine, from going to either the landfill or to Bob's cows (I hope they didn't go hungry waiting for apples!). I wonder what great finds I will come across this week?

Just a few notes about bulgur... The recipe I used, from a magazine called "Cooking for Two", said to soak the bulgur in boiling water for an hour. In my haste, I actually boiled the bulgur on the stove for over an hour. It was really mushy and at that point I realized I had made a mistake. I had already added it to the rest of the salad though, so I continued on and it was still very tasty. Afterwards, I looked up cooking bulgur on the internet. There are many slightly different takes on cooking bulgur but here are a few that seemed keep coming up...

*Don't wash or rinse bulgur before cooking.
*Bulgur can be prepared either by soaking (for salads) or cooking (for casseroles, etc.).
*To soak bulgur, add twice as much liquid as bulgur, stir, let stand covered for 30 minutes or refrigerate overnight.
*When soaked or cooked, bulgur will increase in volume by twice or more, depending on the amount of liquid used.
*You can use stocks or juices instead of water to add more flavour to the bulgur.
*Bulgur is actually whole wheat kernels that have been boiled, dried, and crushed. It can be red or white and comes in a variety of textures. Bulgur is different from cracked wheat because it has been pre-cooked.

So, there you have it - everything you always wanted to know about bulgur! This salad is really very simple, quick, and healthy. It will taste even better when the veggies are in season (I'm dreaming of a vine-ripened Harrow tomato in August!). Is there anyone reading this that still doesn't know where Harrow is??

Tabbouleh with Feta

1 c. dried bulgur wheat
2 c. boiling water
2 c. tomatoes, seeded, and diced
2 c. chopped fresh parsley
1 1/2 c. cucumber, seeded, and diced
1 c. feta cheese, crumbled
1 c. green onions, sliced
1/2 c. chopped fresh mint (I didn't have any so I would consider it optional)
1/4 c. fresh lemon juice
1/4 c. extra-virgin olive oil
Kosher salt to taste.

1. In bowl, pour boiling water over bulgur and cover with plastic wrap. Let sit for 1/2 hour. Drain well before using.
2. While the bulgur is soaking, toss the tomatoes, parsley, cucumber, feta, and green onions in a large bowl. Drain the bulgur and add to the salad ingredients. Pour the lemon juice and olive oil over the salad, season with salt, and toss gently. Chill salad until ready to serve. Makes 4 to 6 servings.
*I doubled this recipe from the original.

Saturday, March 1, 2008

Perfect White Cake

For Ellen's 3rd birthday, we had two birthday dinners. For a change of pace, we had both of these meals around lunchtime. All through high school, I worked at Maria's Hair Villa in Harrow, as a shampoo girl. Maria and her family are from the Azores, and I remember that on Sundays and holidays they would all get together at her mom's house and enjoy a big Sunday lunch. Europeans aren't the only ones that follow this ritual and it struck me lately, that eating in the middle of the day would have many advantages for my family, too.

Let me explain how it worked with having these celebrations at lunch. Firstly, the kids are at their best during the day. Once dinner comes, they are starting to wind down for bedtime, and are usually getting a little grumpy. Eating around 1pm worked really well for the kids, but this isn't the only plus. I worked on both meals during the morning and by the middle of the afternoon, we were finished eating, and I was sitting down with a glass of wine, not a care in the world. We were able to go sledding (all nine of us) in the bright winter sunshine on the first occasion, and last weekend, we sat around the table playing Candyland and Make-A-Match. No one was tired and there was nothing else to be done in the kitchen (except clean-up, my downfall I'm sorry to say!).

Another good reason for doing this was to avoid grazing on appetizers throughout the afternoon, thus taking away our appetite for what was supposed to be the main event, dinner. Then there is the advantage of not going to bed full and we were able to enjoy tea and coffee without the fear that sometime in the night we would be tossing and turning, because we had caffeine before bed. We all agreed that it was a very civilized way of doing a weekend meal. I realize that many of you probably eat like this, but in our family, it is a big shift in our thinking. I am so glad that we gave it a try and having Sunday lunches is definitely going to become a tradition at our house. I must mention that I don't think this will work as well for us in the summer months. Too busy outside and too hot to sit down for a meal before the sun starts to set.

Now, let me tell you about the food. For the first meal with my sister & her family, and my parents, we did a lamb in the crockpot. My mom put the lamb roast on around 6am but I think it would be great to put it on before you go to bed and just keep it on low. Then you could turn it off in the morning and just reheat it before lunch (or keep it in the crockpot on the keep warm setting). The lamb was simple, just garlic and seasonings. I made a rice pilaf from "Please To The Table", the Russian cookbook. It was delicious and very flavourful. It had orange zest, currants, slivered almonds, and tumeric for colour. For a vegetable, I made a huge Greek salad, without lettuce. Add warm pita bread and tzatziki and we had all the fixings for make-your-own gyros. The rice dish was a splash of colour and flavour and everyone loved it. For dessert, I made a vanilla chiffon cake (in a tube pan), with fresh lemon curd layered on the inside, and a raspberry/strawberry mousse on the outside. A chiffon cake is more substantial than an angel food cake, but still quite light.

The second meal was with my father-in-law, the same day that I had him try my butter. I marinated a sirloin steak in a mouth-watering marinade. Apple cider vinegar, soy sauce, sesame oil, cilantro, etc. We then grilled the steak over charcoal. I made a Yukon Gold potato and sweet potato gratin, without cream or cheese. I drizzled olive oil between the layers and put a heavy pan on top of the whole thing while it baked in the oven. It was tasty and not too heavy (not that I mind cream or cheese, as you know!). I found really great looking arugula and I added that to a mixed green salad with a well-seasoned vinaigrette. Delicious! For dessert, I made a wonderful white cake from Bonnie Stern's "Essentials of Home Cooking" cookbook. I thawed some leftover mousseline buttercream and whipped that with a drop or so of blue food colouring, as per Ellen's request. Very simple and very good.

Here is that simple cake recipe. There are no yolks in the cake, making a very white cake, great with any colour of icing. I have made it many times and it also makes wonderful cupcakes. Sometimes you just want a basic white cake, no frills. This is the perfect white cake.

Perfect White Cake

1 c. unsalted butter, at room temperature
1 3/4 c. white sugar
6 egg whites
2 t. vanilla
3 c. all purpose flour
1 T. baking powder
1 1/2 c. milk

1. Prepare two 9-inch cake pans. Butter bottom and sides and then line bottom with parchment paper. Preheat oven to 350 degrees.
2. In a large bowl or KitchenAid mixer, cream butter and sugar until very light. Beat in egg whites two at a time, beating thoroughly after each addition. Beat in vanilla.
3. In a separate bowl, sift together flour and baking powder. If you have been using a mixer, switch to a wooden spoon and blend flour into butter mixture alternately with milk in three additions, beginning and ending with flour. Do not over mix.
4. Divide batter evenly between the pans. Bake for around 25 minutes, or until tester comes out clean. Cool in pans for 10 minutes and then invert onto racks to cool completely.
5. Ice cakes with your favourite icing (I promise I will put my favourite icing on the blog asap).
Makes one 9-inch two-layer cake.

*This recipe makes around 24 large cupcakes. I use the jumbo-sized muffin cups. Reduce the baking time to somewhere around 20 minutes, but check after 15 minutes to be safe.
*For Ellen's white cake with blue icing (see picture above), I used only one layer and I froze the other layer for later use.