Friday, February 27, 2009

A Poached Egg

When was the last time you had a poached egg for breakfast? A poached egg on warm, buttered toast is my favourite winter breakfast; probably my favourite summer breakfast, too. The egg in the pictures struck me as being the perfect poached egg; a farm-fresh egg, cooked to absolute perfection (to my taste, anyway), served on toasted Ace bakery focaccia.

I have several great memories of poached eggs. After having a tummy bug for about 24 hours in grade eight, my first meal was a a poached egg on toast, lovingly served to me on the couch, in front of the TV. There were dinners at the Chateau in France, when there were no guests to serve, and we would put together the most delicious salads you can imagine, each one topped with a poached egg and little pieces of mouth-watering bacon. And more recently, a breakfast made by my friend Elaine in Newfoundland - perfect poached eggs with buttered toast points, served in front of the fireplace, while I read some of her treasured cookbooks.

I also have other memories of poached eggs. Rubbery little discs with yolks that crumble or break off in shards when knocked with a fork. My mom, who was never really too worried about how the eggs ended up, had (and still has) a large pan with an egg poaching insert. Once my sister & I reached an age that we could make our own meals, it was only natural that we would use the poacher. Few things could set our mom off like egg cups that hadn't been sprayed with Pam - very generously - and were left "to soak" in the sink. And my mom didn't think much about the method of cooking an egg directly in boiling water either, even if we did add vinegar. Just too much mess, usually left in the sink - to soak.

I like my poached eggs to be cooked to a certain point. I would say it's medium. It is very easy to miss that point. I don't like to have the whites of the eggs runny at all. I like the yolk to be slightly firm around the outside, but still runny enough to cover the top of the toast. Poached eggs are so very simple, yet I consider the perfect poached egg on toast to be an art form.

For a long time, I abstained from making poached eggs. Once I moved away from home, I never did purchase my own egg poacher. When I started making poached eggs again, it took me many tries to get them the way I wanted. Even now, quite possibly hundreds of successful eggs under my belt, I do have the odd flub now and then. Just the other morning, I cracked an egg into a ramekin and the yolk broke. Instead of continuing, I put the uncooked egg back in the fridge to use for something else, and tried again. Occasionally, there will be a rogue egg that just will not stay together in the water. There is also the fine balance you must strike between keeping one eye on the egg and your other eye on the toast. I like to butter my toast as soon as it pops up, but this has led me to neglect the egg at that crucial moment, thus saddling me with an overdone yolk.

Here is my ritual for making poached eggs.

Bring a small saucepan of water to a gentle boil. Add a splash of white vinegar. Crack one very fresh egg into a ramekin and slowly let the egg slip into the boiling water. If you are cooking more than one, repeat this step. I don't like to poach more than two at a time in a small pan. Don't let the water boil too vigorously once you have added the egg. A gentle boil is good. If the egg seems to be stuck on the bottom of the pan, carefully nudge it off the bottom of the pan with a spoon. For a medium egg, it usually takes around 3 minutes or so to cook. When the egg is cooked to your liking, remove from the water and drain on a piece of paper towel. Dry well. Place on the toast of your choice and mash with a fork. Sprinkle with sea salt and freshly ground black pepper. Enjoy!
Monday, February 16, 2009

Meyer Lemon Curd


When I heard that my God-daughter, Elsa (not even a year old yet), was a big fan of Meyer lemons, it occurred to me that I had never tried them myself. Elsa does have an unfair advantage over most people I know, as she lives in New York City, and frequents many world-class foodie spots with her food-savvy parents. With that said, I thought it would be a good move to familiarize myself with one of her favourite things. A little unusual to bond with a baby over lemons, but I'm open to trying new things.

Meyer lemons are not an ingredient that you see very often in regular supermarkets, in Canada anyway. Meyer lemons taste like a cross between a lemon and a mandarin orange. They are quite a bit sweeter than a true lemon, but still sour enough to be identified as being from the lemon family.

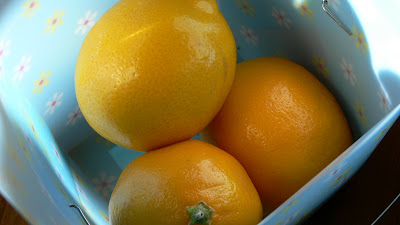
It wasn't until last week that I saw the elusive lemons in person. I bought a bag of them and they were absolutely beautiful to look at. They were a perfect lemon-yellow, with thin, unblemished skin. I would describe them as the super-models of the lemon world. Gorgeous. The picture above gives you the idea, and those had already been hanging around my kitchen for a week or so. The smell of the Meyer lemons was intoxicating. I kept picking them up and smelling them, trying to wrap my head around how beautiful they smelled.

From the minute I saw these lemons, I knew that a lemon curd would be in order. With my parents having just been here, stocking our fridge with farm-fresh Harrow eggs*, I had all the best ingredients to make lemon curd.

*My mom has been buying eggs for me for the last year or so (I do pay her for them - well, sometimes...). I really like the eggs that she finds for me down there, so I get her to pick me up 3 or 4 dozen every time we are going to see each other.

Lemon curd can be used for many things. I like to use it in between layers of a white cake. Or try it with angel food cake and raspberries or on cream scones for an afternoon treat. If this recipe made more, I would have canned the lemon curd in little jars to give away as gifts. But mostly, I like to make several furtive trips to the fridge with a spoon, until all the curd has magically disappeared.

Meyer Lemon Curd


4 large egg yolks
2/3 c. granulated sugar
3 ounces freshly squeezed Meyer lemon juice (about 2 or 3 large lemons)
4 T. unsalted butter
Pinch of sea salt
1 t. lemon zest

1. In a heavy saucepan, beat the egg yolks and the sugar until well blended. Stir in the remaining ingredients, except the the lemon zest, and cook slowly over medium-low heat. Stir constantly, until slightly thickened. Should coat the back of a wooden spoon but still be pourable. Do not let the mixture boil or it will curdle.
2. When the curd has thickened, immediately remove from the heat and pour through a fine strainer. Press through the strainer with the back of a spoon. Stir in the lemon zest and cool. Pour into an airtight container. The curd will keep thickening as it sits and cools. Makes 1 cup.

Saturday, February 7, 2009

Birdie's Chicken

This recipe holds a very special spot in my heart. This was the chicken dish that my Grandma McDonald would make for special occasions. Her name was Bertha, but she was also known affectionately as 'Birthday' and my favourite, (but not a name I would have ever referred to her as) 'Birdie'. In fact, I like the name Birdie so much that I now use it as Ellen's nickname, and I hope it sticks.

The picture above shows the chicken just before I put it in the oven. The low temperature of the oven and the long cooking time create melt-in-your-mouth chicken that falls off the bones. I don't recall my grandma ever taking the skin off her chicken before cooking it. I have removed the skin before, but I remember thinking that the skin adds something to the overall dish, and I tend to leave it on now, too (I do trim any excess skin off before dipping in the eggs and cracker crumbs). It doesn't mean you have to eat the skin, if you don't want to. Just remove it after it's cooked. You may find this recipe a little loosey-goosey, but it doesn't lend itself to being an exact sort of recipe.

This chicken goes well with mashed potatoes, scalloped potatoes... any sort of comforting starch, actually. Maybe some nice steamed veggies, to offset all this comfort, and a leafy, green salad.

Birdie's Chicken

1 whole chicken, or as much chicken as you need
Saltines, crushed into crumbs with a food processor
Eggs, beaten
Onions, sliced
Butter, a few pats

1. Preheat the oven to 325 degrees. Cut the chicken into pieces, if you are using a whole chicken. Wash and dry the chicken pieces.
2. Dip chicken pieces in beaten eggs, and then roll in cracker crumbs. Place one layer of chicken in a casserole dish. Sprinkle with salt & pepper and place a slice of onion on each chicken piece. Layer the rest of the chicken on top of the first layer. Dot the top with butter. Add 3 tablespoons of water to the dish. Cover and bake 4 hours.

Sunday, February 1, 2009

Duck, Duck, Goose

Here's something new - a guest blog entry! Before Christmas, my sister Lori made duck confit for a dinner party and then she wrote about it. When it comes to duck confit, I've never made it from scratch, but I have opened my cans of the stuff while living in France. I brought two larges cans home in 1998 and we just enjoyed them a couple years ago. They were still very good but Alan was, you might say, put off by the whole idea of them. Where is his sense of adventure??


Duck, Duck, Goose
By Lori Elstone

It all started when I saw a jar of red currant jelly. The good stuff - made with the fruit's natural pectin. "Isn't that the traditional glaze for duck confit?" I wondered to myself. I imagined plump, rich duck legs smeared with jelly. Delicious.

I was immediately on a mission and purchased 6 duck legs from a local supplier. As luck would have it, I had a stash of duck fat in the freezer in case of an emergency. (Okay, potatoes fried in duck fat don't ever constitute an emergency, but that's beside the point.) Fat is the key component in making confit - a centuries-old process perfected in France. It consists of salt-curing a piece of meat and then poaching in it's own fat. In the days before refrigeration, this was an essential technique for preserving duck, goose, and pork.

When I got home, I was surprised to see the skin of the duck still had a few feathers sticking out. It gave new meaning to the term 'goose-bumps'. I plucked out the remaining quills, doing my best to keep the skin from tearing. Next I rubbed the salt, sugar and herbs onto the duck legs, packed them tightly into a glass dish and began planning the rest of the dinner.

The next evening, while the duck was poaching in the oven, I prepared the traditional, comforting side dishes of braised red cabbage and celery root mashed potatoes. They became the perfect compliments to the salty richness of the duck. It was a wonderful meal. The red currant jelly? It later made it's way into a batch of walnut rugelach. But I'll save that story for another time.

Duck Confit
6 duck legs
1 1/2 c. coarse sea salt
1/4 c. granulated sugar
6-8 fresh thyme sprigs
2 bay leaves, broken into pieces
1 t. coarsely cracked black pepper
1 t. crushed juniper berries (optional)
1 litre duck fat

1. Mix all dry ingredients together in a stainless steel bowl, pulling the thyme leaves off the stalks. Dredge the duck legs in the salt mixture until well coated and transfer to a 9x13 pan. Discard remaining salt mixture. Refrigerate for 24 hours.

2. Preheat the oven to 275 degrees. Melt the duck fat in a saucepan. Rinse the duck legs gently under cold running water and pat dry with paper towel. Place the duck in an oven-proof dish so that it is packed snugly. Pour the fat over the duck. If it does not completely submerge the duck, the addition of vegetable oil is acceptable. Cover the container with a lid or tin foil and cook for at least 3 hours, checking periodically. The duck will be done when it effortlessly comes away from the bone.

3. Duck confit will keep for 4-5 days in the fridge, 6-8 weeks in the freezer, and 3 months or longer when submerged in the cooking fat and refrigerated.

Tomato & Cheddar Pie

I have two new favourite books. Home cooking and More Home Cooking, both by Laurie Colwin. Maybe you have seen these books before? I hadn't. While I was visiting Elaine in November, she happened to pull out her copies of these books and I was instantly intrigued. These books are wonderful. They are what I wish this blog (and others) were more like. With chapter titles like, "Alone in the kitchen with an eggplant" and "Jet-Lag and how to feed it", there was no way that I wouldn't love these books. Alas, Laurie Colwin is no longer with us, but her books are definitely living on.

In More Home Cooking there is a chapter on tomatoes. She writes about a tea room in Connecticut that served a tomato pie. She describes how the pie is made and then she has a wonderful sentence that got me out of my favourite chair and into the kitchen.

"It is hard to describe how delicious this is, especially on a hot day with a glass of magnificent iced tea in a beautiful setting, but it would doubtless be just as scrumptious on a cold day in your warm kitchen with a cup of coffee." - Laurie Colwin

It's cold here. I want my kitchen to be warm like that. I want to eat tomato pie with a cup of coffee. So, that is what I did.

Tomato & Cheddar Pie

At the tea room that Laurie describes, they make the crust with a biscuit dough. I happened to have two discs of pie dough that were collecting dust, so I used those instead.

2-28 oz. cans best quality tomatoes (I used my own), drained well and cut thin
1/2 c. green onions, sliced
1 1/2 c. extra-old cheddar cheese, grated
1/3 c. mayonnaise
2 T. fresh lemon juice
Double-crust pie shell

1. Preheat oven to 450 degrees. Roll out the bottom pie crust and fit into a pie plate.
2. Make sure your tomatoes are well drained, otherwise your bottom crust will be soggy. Place the cut tomatoes in the pie shell. Scatter the green onions over the top. Sprinkle 1 cup of the cheese over the tomatoes and onions.
3. Mix the mayo and the fresh lemon juice together. Drizzle over the cheese. Sprinkle last 1/2 cup of cheese on top of everything.
4. Roll out the top crust and seal the edges. Cut slits in the top for the steam to escape. Brush the top with an egg wash (1 egg beaten with a little milk or water). Place into hot oven and turn the temperature down to 350 degrees. Bake for 45 minutes to an hour, until the crust is nice and golden. Let cool and enjoy with your cup of coffee.

*I ate this for a few meals. I heated up a slice of pie in the oven for about 15 minutes, just until everything was warm and the cheese was soft and melting again.